


By Brian Potter
While once the poster child of CPR training, Resusci Anne manikins are no longer as popular as they once were in CPR training. Less expensive and lighter to carry around from class to class, more modern manikins have replaced Resusci Anne as the gold standard in CPR training today.
Instead of sending those old Resusci Anne manikins to the CPR training manikin graveyard though, a great deal of training benefit can still be obtained from them in the world of EMS. One such use that we have discovered in order to return the once retired Resusci Anne manikin to active duty is to convert the manikin into a tracheostomy training manikin.
In today’s society of more advanced medical care, more patients are being sent home from hospitals to function in everyday life, breathing through tracheostomy tubes. As a result, it is imperative that EMS providers have at least some understanding of tracheostomy tubes and how to manage the airway in patients where the trach is their primary airway. The purpose of this article is to provide instructions or guidelines for how to convert a Resusci Anne manikin into a tracheostomy training manikin.
Step 1: Take the face, chest, and neck “skin” covering off the manikin.
Step 2: Using a drill, puncture the front portion of the manikin’s neck, just below the existing hole for the manikin’s carotid pulse attachment (see figure 1).
|
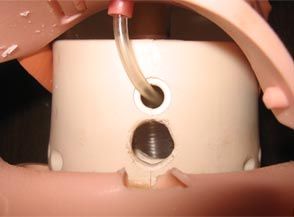
It will also be necessary to drill through the “skin” that covers the front of the manikin’s neck.
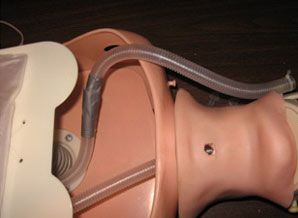
Step 3: The tubing that attaches to the manikin’s lungs has two additional openings, one of which runs to the mouth of the manikin, and the second, which is unattached. An additional piece of tubing will need to be spliced to the unattached piece as this will be where the trach tube is inserted. In our case, duct tape was used to hold the pieces of tubing together (see figure 2).
|
Step 4: Insert the trach tube through the front of the neck and into the end of the piece of unattached tubing that leads to the manikin’s lungs (see figure 3).
|
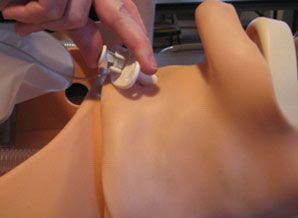
It may be necessary to tape or tie the tubing around the trach tube to hold the trach in place. In our case, a zip tie was used around the end of the tubing to prevent the trach from pulling back out.
*A special consideration to note with this step is to find out what type of trach tube is most likely to be utilized in patients in your area, and try to obtain that type of Trach tube for use with the manikin. This will only further enhance the training benefit to your providers by familiarizing them with the tube they will mostly likely see in the field.
Step 5: Once the trach tube has been inserted and secured to the lung tubing, attach a bag valve mask to it to ensure the lungs inflate (see figure 4).
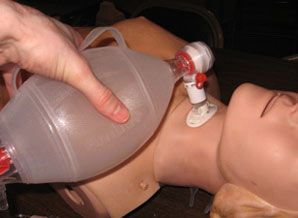 Photo courtesy Brian Potter Figure 4: Ventilating the tracheostomy tube to ensure lung inflation/chest rise before putting manikin completely back together and securing the trach tube. |
Step 6: Put the manikin back together by replacing the face, chest, and neck “skin” covering.
Step 7: You are ready to utilize the manikin to teach other EMS providers how to manage the airway in a patient with a tracheostomy (see figure 5).
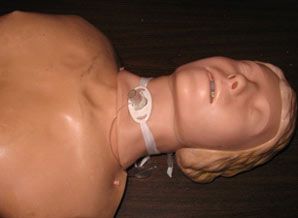 Photo courtesy Brian Potter Figure 5: Completed tracheostomy manikin ready to utilize in classes or training sessions. |
The completed manikin can be utilized to teach EMS providers a variety of airway management techniques, including suctioning, delivery of supplemental oxygen, and ventilation of the tracheostomy tube. While EMS providers may not encounter patients on a daily basis that have a tracheostomy as their primary airway, it is inevitable that they will encounter these patients, and having the ability to train hands-on can go a long way towards increasing provider comfort and skill proficiency in managing this type of airway.
Brian Potter, MS, ATC, EMT-B is affiliated with the Upshur County Emergency Squad, is a West Virginia Emergency Medical Services Instructor, and serves as an Adjunct Instructor in Exercise Science at West Virginia Wesleyan College in Buckhannon, WV.
Joey Baxa, FF, EMT-B is a career firefighter/EMT with Buckhannon Fire Department and Upshur County Emergency Squad in Buckhannon, WV, and is active in coordinating training activities with both agencies.